Quantcast
Channel: Keycloak
Viewing all 99 articles
Browse latest View live

Easily secure your Spring Boot applications with Keycloak

$
0
0

What is Keycloak?

Although security is a crucial aspect of any application, its implementation can be difficult. Worse, it is often neglected, poorly implemented and intrusive in the code. But lately, security servers have appeared which allow for outsourcing and delegating all the authentication and authorization aspects. Of these servers, one of the most promising is Keycloak, open-source, flexible, and agnostic of any technology, it is easily deployable/adaptable in its own infrastructure. Moreover, Keycloak is more than just an authentication server, it also provides a complete Identity Management system, user federation for third parties like LDAP and a lot more ... Check it out on here. The project can also be found on Github

Spring Boot and Keycloak

Keycloak provides adapters for an application that needs to interact with a Keycloak instance. There are adapters for WildFly/EAP, NodeJS, Javascript and of course for Spring Boot.

Setting up a Keycloak server


You have different options to set up a Keycloak server but the easiest one is probably to grab a standalone distribution, unzip it and voila! Open a terminal and go to your unzipped Keycloak server and from the bin directory simply run:
./standalone.sh(bat)
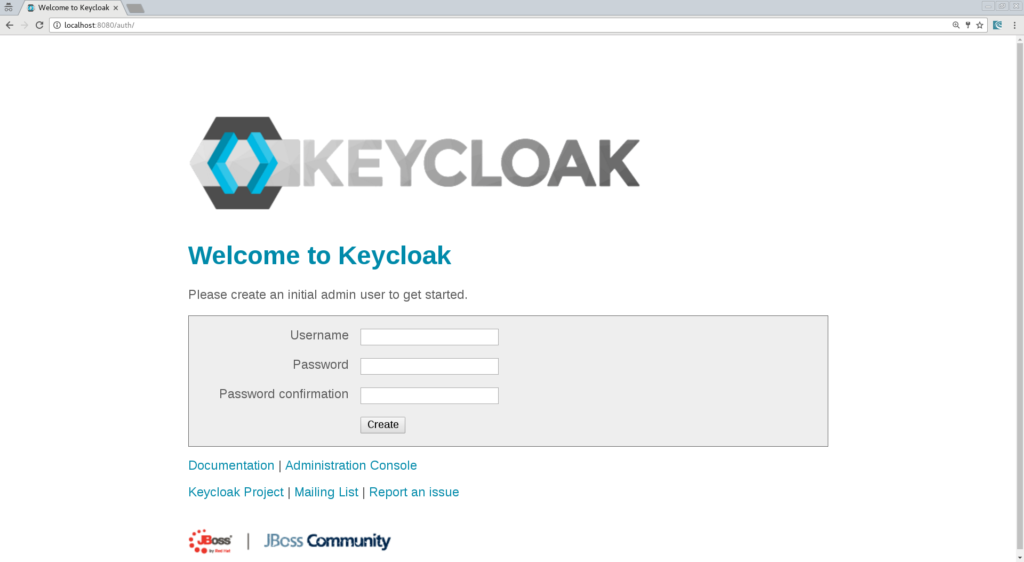
Then open a browser and go to http://localhost:8080/auth. Since it's the first time that the server runs you will have to create an admin user, so let's create an admin user with admin as username and admin for the password:
 

Now you can log in into your administration console and start configuring Keycloak.

Creating a new Realm
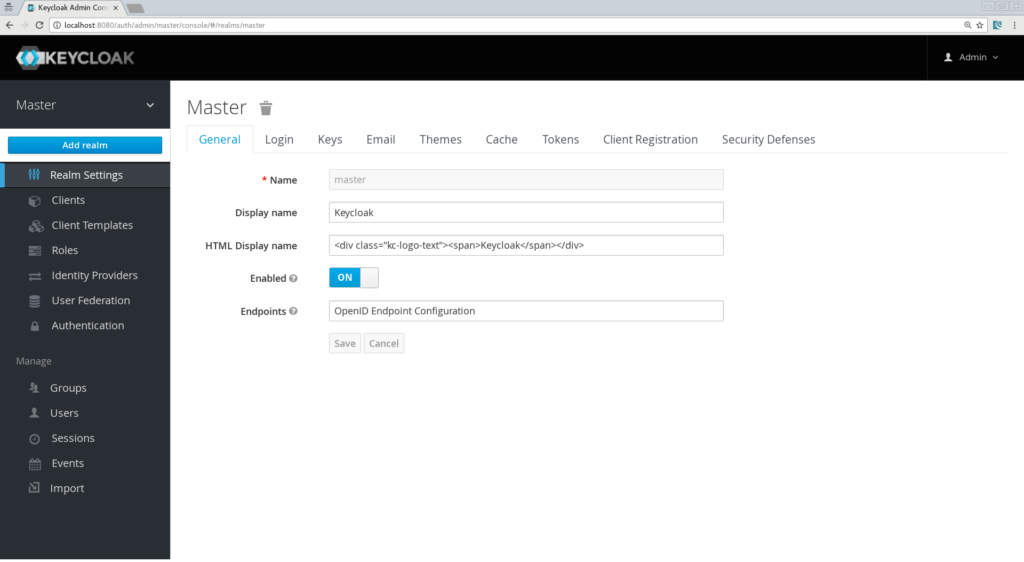

Keycloak defines the concept of a realm in which you will define your clients, which in Keycloak terminology means an application that will be secured by Keycloak, it can be a Web App, a Java EE backend, a Spring Boot etc. So let's create a new realm by simply clicking the "Add realm" button:


Let's call it "SpringBoot".

Creating the client, the role, and the user
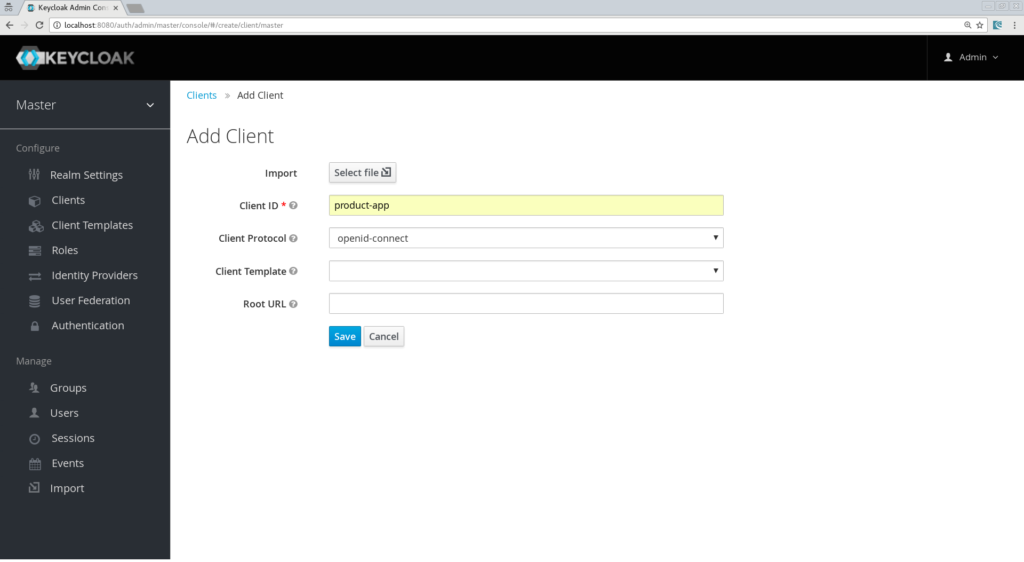

Now we need to define a client, which will be our Spring Boot app. Go to the "Clients" section and click the "create" button. We will call our client "product-app":


On the next screen, we can keep the defaults settings but just need to enter a valid redirect URL that Keycloak will use once the user is authenticated. Put as value: "http://localhost:8081/*"
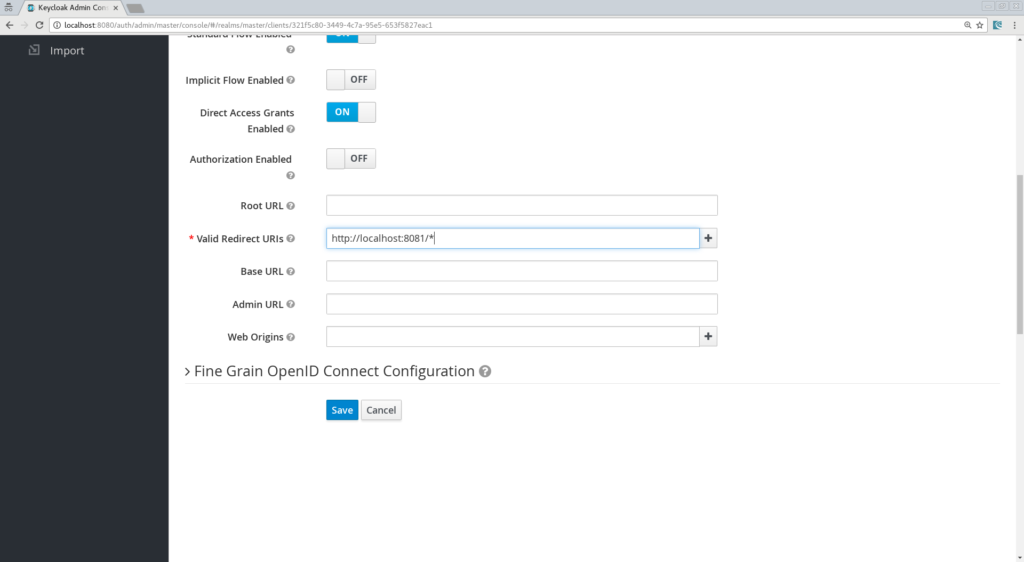
 

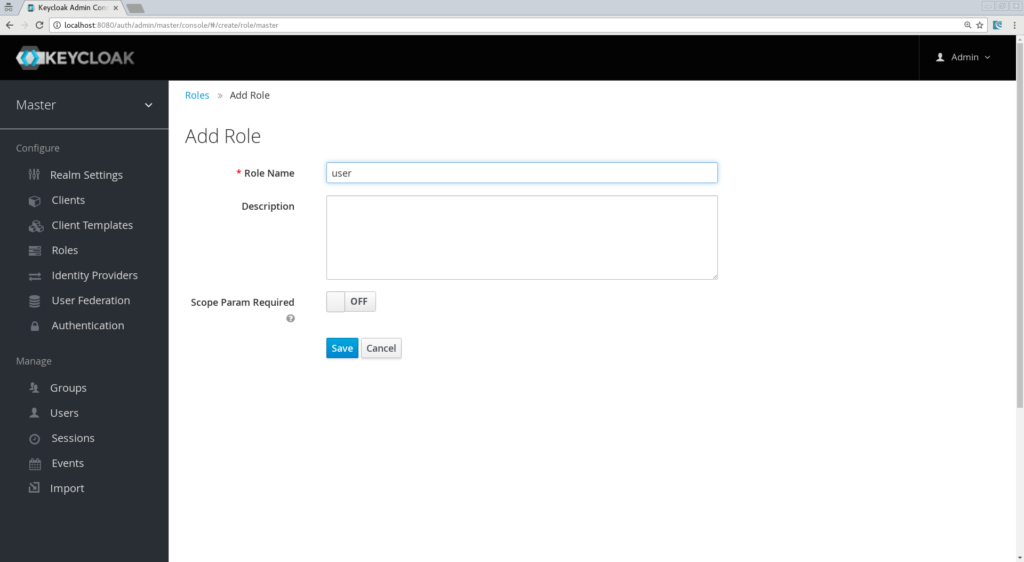
Don't forget to Save! Now, we will define a role that will be assigned to our users, let's create a simple role called "user":
 

And at last but not least let's create a user, only the username property is needed, let's call him "testuser":
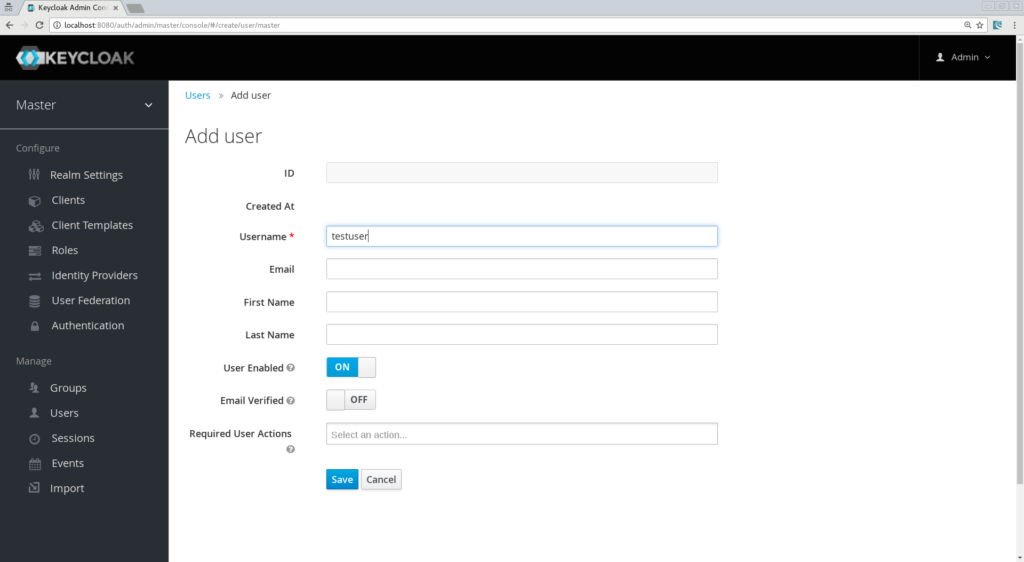
 

And finally, we need to set his credentials, so go to the credentials tab of your user and choose a password, I will be using "password" for the rest of this article, make sure to turn off the "Temporary" flag unless you want the user to have to change his password the first time he authenticates. Now proceed to the "Role Mappings" tab and assign the role "user":
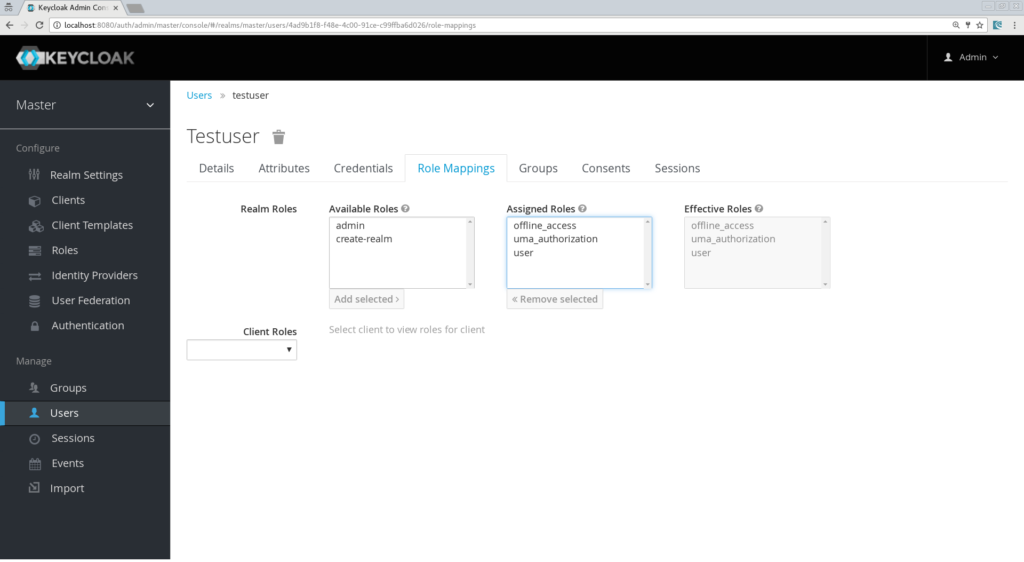
 

We are done for now with the Keycloak server configuration and we can start building our Spring Boot App!

Creating a simple app


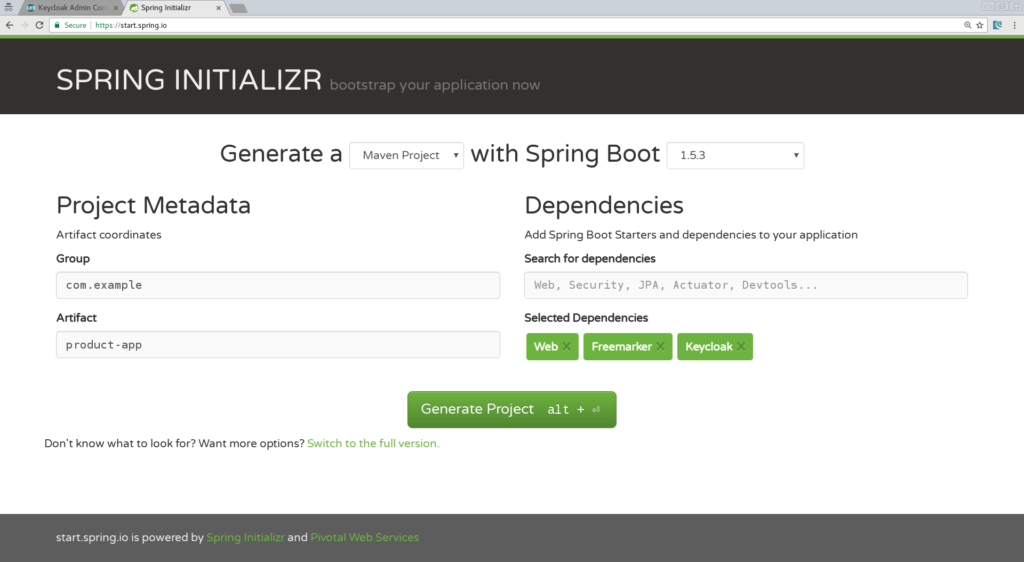
Let's create a simple Spring Boot application, you might want to use the Spring Initializr and choose the following options:
  • Web
  • Freemarker
  • Keycloak
Name your app "product-app" and download the generated project:


Import the application in your favorite IDE, I will be using IntelliJ. Our app will be simple and will contain only 2 pages:
  • An index.html which will be the landing page containing just a link to the product page.
  • Products.ftl which will be our product page template and will be only accessible for authenticated user.
Let's start by creating in simple index.html file in "/src/resources/static":

<html>
<head>
<title>My awesome landing page</title>
</head>
<body>
<h1>Landing page</h1>
<a href="/products">My products</a>
</body>
</html>


Now we need a controller: 

@Controller
class ProductController {

@Autowired ProductService productService;

@GetMapping(path = "/products")
public String getProducts(Model model){
model.addAttribute("products", productService.getProducts());
return "products";
}

@GetMapping(path = "/logout")
public String logout(HttpServletRequest request) throws ServletException {
request.logout();
return "/";
}
}
As you can see, it's simple; we define a mapping for the product page and one for the logout action. You will also notice that we are calling a "ProductService" that will return a list of strings that will put in our Spring MVC Model object, so let's create that service: 
@Component
class ProductService {
public List<String> getProducts() {
return Arrays.asList("iPad","iPod","iPhone");
}
}
We also need to create the product.ftl template, create this file in "src/resources/templates": 

<#import "/spring.ftl" as spring>
<html>
<h1>My products</h1>
<ul>
<#list products as product>
<li>${product}</li>
</#list>
</ul>
<p>
<a href="/logout">Logout</a>
</p>
</html>
Here we simply iterate through the list of products that are in our Spring MVC Model object and we add a link to log out from our application.  All that is the left is adding some keycloak properties in our application.properties. 

Defining Keycloak's configuration


Some properties are mandatory:

keycloak.auth-server-url=http://localhost:8080/auth
keycloak.realm=springboot
keycloak.public-client=true
keycloak.resource=product-app
Then we need to define some Security constraints as you will do with a Java EE app in your web.xml: 
keycloak.security-constraints[0].authRoles[0]=user
keycloak.security-constraints[0].securityCollections[0].patterns[0]=/products/*
Here, we simply define that every request to /products/* should be done with an authenticated user and that this user should have the role "user". One last property is to make sure our application will be running on port 8081:

server.port=8081
We are all set and we can run our app!  You have several options to run your Spring Boot application, with Maven you can simply do: 

mvn clean spring-boot:run
Now browse to "http://localhost:8080" and you should see the landing page, click the "products" links and you will be redirected to the Keycloak login page:
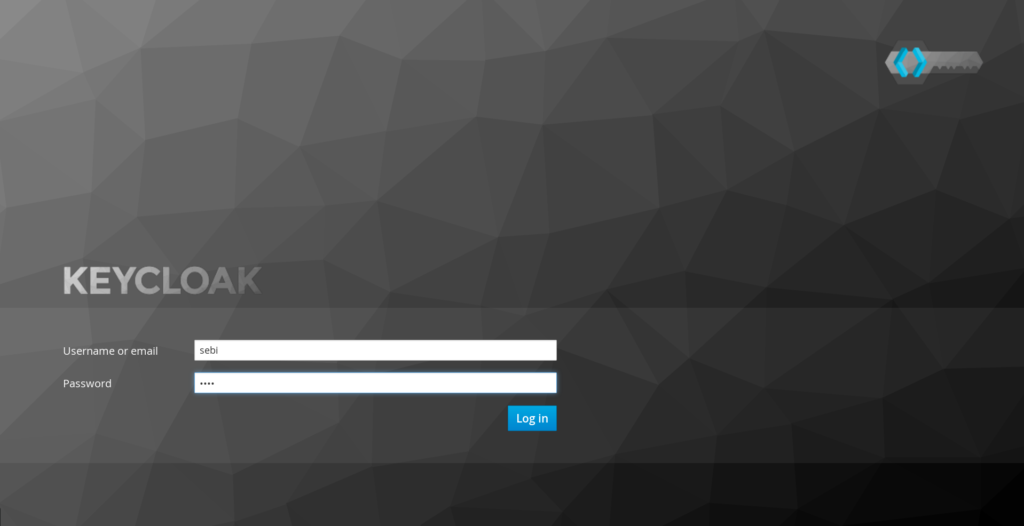
 

Login with our user "testuser/password" and should be redirected back to your product page:

 

Congratulations! You have secured your first Spring Boot app with Keycloak. Now Log out and go back to the Keycloak administration console and discover how you can "tune" your login page. For instance, you can activate the "Remember Me", the "User Registration", hit the save button and go back to your login screen, you will see that these features have been added.

Introducing Spring Security support


If you're a Spring user and have been playing around security, there is a big chance that you have been using Spring Security. Well, I have some good news: we also have a Keycloak Spring Security Adapter and it's already included in our Spring Boot Keycloak Starter. Let's see how we can leverage Spring Security together with Keycloak.

Adding Spring Security Starter


First, we need the Spring Security libraries, the easiest way to do that is to add the spring-boot-starter-security artifact in your pom.xml:

<dependency>
<groupId>org.springframework.boot</groupId>
<artifactId>spring-boot-starter-security</artifactId>
</dependency>

Creating a SecurityConfig class


Like any other project that is secured with Spring Security, a configuration class extending WebSecurityConfigurerAdapter is needed. Keycloak provides its own subclass that you can again subclass:

@Configuration
@EnableWebSecurity
@ComponentScan(basePackageClasses = KeycloakSecurityComponents.class)
class SecurityConfig extends KeycloakWebSecurityConfigurerAdapter
{
/**
* Registers the KeycloakAuthenticationProvider with the authentication manager.
*/
@Autowired
public void configureGlobal(AuthenticationManagerBuilder auth) throws Exception {
KeycloakAuthenticationProvider keycloakAuthenticationProvider = keycloakAuthenticationProvider();
keycloakAuthenticationProvider.setGrantedAuthoritiesMapper(new SimpleAuthorityMapper());
auth.authenticationProvider(keycloakAuthenticationProvider);
}

@Bean
public KeycloakConfigResolver KeycloakConfigResolver() {
return new KeycloakSpringBootConfigResolver();
}

/**
* Defines the session authentication strategy.
*/
@Bean
@Override
protected SessionAuthenticationStrategy sessionAuthenticationStrategy() {
return new RegisterSessionAuthenticationStrategy(new SessionRegistryImpl());
}

@Override
protected void configure(HttpSecurity http) throws Exception
{
super.configure(http);
http
.authorizeRequests()
.antMatchers("/products*").hasRole("user")
.anyRequest().permitAll();
}
}
Let's have a closer look at the most important methods: 
  • configureGlobal: Here we change the Granted Authority Mapper, by default in Spring Security, roles are prefixed with ROLE_, we could change that in our Realm configuration but it could be confusing for other applications that do not know this convention, so here we assign a SimpleAuthorityMapper that will make sure no prefix is added.
  • keycloakConfigResolver: By default, the Keycloak Spring Security Adapter will look up for a file named keycloak.json present on your classpath. But here we want to leverage the Spring Boot properties file support.
  • configure: Here is where we define our security constraints, pretty simple to understand we secure the path "/products" with role "user"
Now we can remove the security constraints that we had defined previously in our application.properties file and let's add another property to map the Principal name with our Keycloak username:
keycloak.principal-attribute=preferred_username
Now we can even inject the principal in our controller method and put the username in the Spring MVC model:

@GetMapping(path = "/products")
public String getProducts(Principal principal, Model model){
model.addAttribute("principal",principal);
model.addAttribute("products", productService.getProducts());
return "products";
}
Finally, we update the product.ftl template to print out the username: 

<#import "/spring.ftl" as spring>
<html>
<h1>Hello ${principal.getName()}</h1>
<ul>
<#list products as product>
<li>${product}</li>
</#list>
</ul>
<p>
<a href="/logout">Logout</a>
</p>
</html>
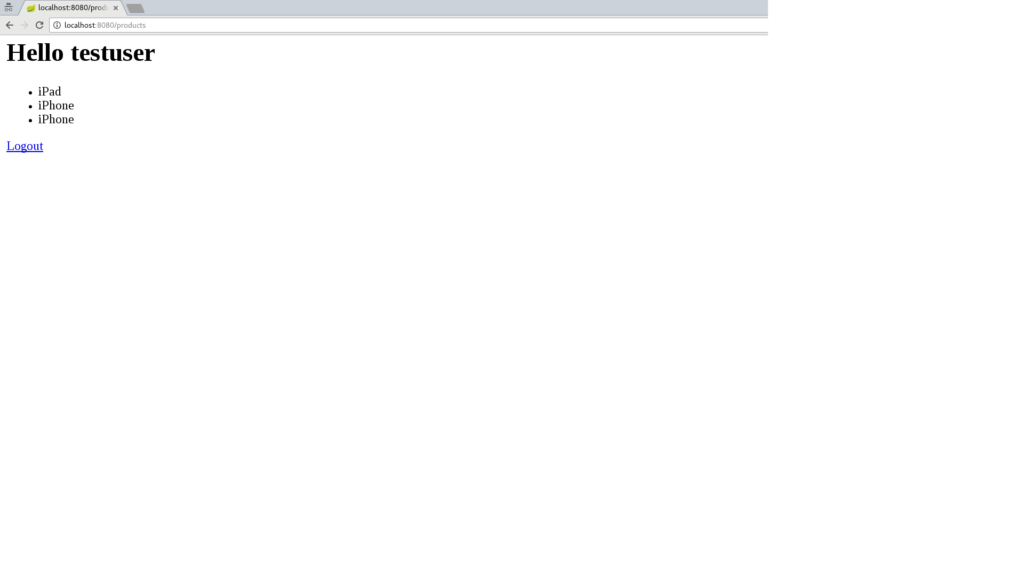
Restart your app, authenticate again, it should still work and you should also able to see your username printed on the product page:
   

Conclusion


We saw in this article how to deploy and configure a Keycloak Server and then secure a Spring Boot app, first by using Java EE security constraints and then by integrating Spring Security. In the next article, we will decompose this monolith application, which will give us the opportunity to:
  • See how to secure a microservice.
  • How microservices can securely "talk" to each other.
  • How a Pure Web App build with AngularJS can be secured with Keycloak and call secured microservices.

Screencast

This article is also available in "screencast" format :

Resources


Keycloak 3.2.0.CR1

$
0
0

We've just released Keycloak 3.2.0.CR1.

To download the release go to the Keycloak homepage.

Highlights

Fine grained admin permissions

This is something that we've wanted to add for a long time! Through our authorization services it's now possible to finely tune permissions for admins. This makes it possible to limit what clients, users, roles, etc. admins have access to. Documentation is missing for this at the moment, but will be added in time for 3.2.0.Final.

Docker Registry support

It's not possible to secure a Docker Registry with a standard OAuth or OpenID Connect provider. For some strange reason they have only partially followed the specifications and the Docker Registry maintainers refuse to fix this! Fear not, thanks to cainj13 who contributed this we now have a special Docker Registry protocol that can be enabled in Keycloak.

Authentication sessions and access tokens

In the effort to provide support for running Keycloak in multiple data centers we've done a large amount of work around user sessions. We've introduced authentication sessions that are special sessions used primarily during the authentication flows. There are two main reasons for this. Authentication flows can fairly easily be fixed to a specific node within a specific data center and there is no need to replicate this to other data centers. They are also more write heavy than the user sessions. The introduction of access tokens makes it possible to detach actions (for example verify email) from a user session, which has a number of benefits. More will come in future 3.x releases and by the end of the year we aim to fully support replicating Keycloak cross multiple data centers.

Authorization Service improvements

There's been a lot of work done to the authorization services in this release. Way to many to list here so check out JIRA for details.

QuickStarts

We've introduced new QuickStarts with the aim to make it even simpler for you to get started securing your applications and services with Keycloak. The QuickStarts have proper tests as well, which can serve as a reference on how to tests your own applications and services secured with Keycloak. Check out the new QuickStarts in the keycloak-quickstarts GitHub repository.

Upgraded AngularJS and JQuery

We've upgraded the versions we use of AngularJS and JQuery as there where a number of known vulnerabilities. We're fairly certain neither of the known vulnerabilities affect Keycloak, but to be on the safe side we decided to upgrade.

Updated Password Hashing Algorithms

We're still using PBKDF2, but we've added support for SHA256 and SHA512. PBKDF2 is SHA256 is now used by default.

Spring Boot QuickStarter

We've added a new Spring Boot QuickStarter that makes it super simple to get started securing your Spring Boot applications. For more details check out the blog post about it.

Loads more..

  • Partial export of realms in the admin console
  • Redirect URI rewrite rules for adapters
  • Test email settings in the admin console
  • Initial access tokens now persisted to the db

The full list of resolved issues is available in JIRA.

Upgrading

Before you upgrade remember to backup your database and check the migration guide. Release candidates are not recommended in production and we do not support upgrading from release candidates.

Keycloak 3.2.0.Final Released

$
0
0

Keycloak 3.2.0.Final has just been released.

To download the release go to the Keycloak homepage.

The full list of resolved issues is available in JIRA.

Upgrading

Before you upgrade remember to backup your database and check the migration guide.

Keycloak 3.2.1.Final released

$
0
0

Keycloak 3.2.1.Final has just been released.

This release doesn't contain any new features. However there are few fixed bugs related to Authorization services and new permissions for Admin REST API.

To download the release go to the Keycloak homepage .

The full list of resolved issues is available in JIRA .

Upgrading

Before you upgrade remember to backup your database and check the migration guide .

Keycloak 3.3.0.CR1 Released

$
0
0

We've just released Keycloak 3.3.0.CR1.

To download the release go to the Keycloak homepage.

Highlights

Upgraded to WildFly 11 CR1

We've upgraded the underlying container to WildFly 11 CR1.

Cross DC Support

We've done loads of work to support multiple data centers. It's not 100% completed yet, but we'd love it if folks could give it a go and let us know what works well and what doesn't. There will be a blog post soon on how to try this out.

More Social

We've added support for social login with BitBucket and Gitlab.com.

Loads more..

  • Dutch translation - thanks to gedejong and Jacob van Lingen
  • Pass login_hint to identity brokers - thanks to dmnboutin

The full list of resolved issues is available in JIRA.

Upgrading

Before you upgrade remember to backup your database and check the migration guide. Release candidates are not recommended in production and we do not support upgrading from release candidates.

Cross-Datacenter support in Keycloak

$
0
0

In Keycloak 3.3.0.CR1 we added basic setup for cross-datacenter (cross-site) replication. This blogpost covers some details about it. It consists of 2 parts:

  • Some technical details and challenges, which we needed to address
  • Example setup

If you're not interested in too much details, but rather want to try things, feel free to go directly to the example. Or viceversa :-)

Here is the picture with the basic example architecture

Technical details

In typical scenario, end user's browser sends HTTP request to the frontend loadbalancer server. This is usually HTTPD or Wildfly with mod_cluster, NGinx, HA Proxy or other kind of software or hardware loadbalancer. Loadbalancer then forwards HTTP requests to the underlying Keycloak instances, which can be spread among multiple datacenters (sites). Loadbalancers typically offer support for sticky sessions, which means that loadbalancer is able to forward HTTP requests from one user always to the same Keycloak instance in same datacenter.

There are also HTTP requests, which are sent from client applications to the loadbalancer. Those HTTP requests are backchannel requests. They are not seen by end user's browser and can't be part of sticky session between user and loadbalancer and hence loadbalancer can forward the particular HTTP request to any Keycloak instance in any datacenter. This is challenging as some OpenID Connect or SAML flows require multiple HTTP requests from both user and application. Because we can't reliably rely on sticky sessions, it means that some data need to be replicated between datacenters, so they are seen by subsequent HTTP requests during particular flow.

Authentication sessions

In Keycloak 3.2.0 we did some refactoring and introduced authentication sessions. There is separate infinispan cache authenticationSessions used to save data during authentication of particular user. This cache usually involves just browser and Keycloak server, not the application. Hence we usually can rely on sticky sessions and authenticationSessions cache content usually doesn't need to be replicated among datacenters.

Action tokens

In 3.2.0 we introduced also action tokens, which are used typically for scenarios when user needs to confirm some actions asynchronously by email. For example during forget password flow. The actionTokens infinispan cache is used to track metadata about action tokens (eg. which action token was already used, so it can't be reused second time) and it usually needs to be replicated between datacenters.

Database

Keycloak uses RDBMS to persist some metadata about realms, clients, users etc. In cross-datacenter setup, we assume that either both datacenters talk to same database or every datacenter has it's own database, but both databases are synchronously replicated. In other words, when Keycloak server in site 1 persists any data and transaction is commited, those data are immediatelly visible by subsequent DB transactions on site 2.

Details of DB setup are out-of-scope of Keycloak, however note that many RDBMS vendors like PostgreSQL or MariaDB offers replicated databases and synchronous replication. Databases are not shown in the example picture above just to make it a bit simpler.

Caching and invalidation of persistent data

Keycloak uses infinispan for cache persistent data to avoid many unecessary requests to the database. Caching is great for save performance, however there is one additional challenge, that when some Keycloak server updates any data, all other Keycloak servers in all datacenters need to be aware of it, so they invalidate particular data from their caches. Keycloak uses local infinispan caches called realms, users and authorization to cache persistent data.

We use separate cache work, which is replicated among all datacenters. The work cache itself doesn't cache any real data. It is defacto used just for sending invalidation messages between cluster nodes and datacenters. In other words, when some data is updated (eg. user "john" is updated), the particular Keycloak node sends the invalidation message to all other cluster nodes in same datacenter and also to all other datacenters. Every node then invalidates particular data from their local cache once it receives the invalidation message.

User sessions

There are infinispan caches sessions and offlineSessions, which usually need to be replicated between datacenters. Those caches are used to save data about user sessions, which are valid for the whole life of one user's browser session. The caches need to deal with the HTTP requests from the end user and from the application. As described above, sticky session can't be reliably used, but we still want to ensure that subsequent HTTP requests can see the latest data. Hence the data are replicated.

Brute force protection

Finally loginFailures cache is used to track data about failed logins (eg. how many times user john filled the bad password on username/password screen etc). It is up to the admin if he wants this cache to be replicated between datacenters. To have accurate count of login failures, the replication is needed. On the other hand, avoid replicating this data can save some performance. So if performance is more important then accurate counts of login failures, the replication can be avoided.

Communication details

Under the covers, there are multiple separate infinispan clusters here. Every Keycloak node is in the cluster with the other Keycloak nodes in same datacenter, but not with the Keycloak nodes in different datacenters. Keycloak node doesn't communicate directly with the Keycloak nodes from different datacenters. Keycloak nodes use external JDG (or infinispan server) for communication between datacenters. This is done through the Infinispan HotRod protocol.

The infinispan caches on Keycloak side needs to be configured with the remoteStore, to ensure that data are saved to the remote cache, which uses HotRod protocol under the covers. There is separate infinispan cluster between JDG servers, so the data saved on JDG1 on site 1 are replicated to JDG2 on site 2.

Finally the receiver JDG server then notifies Keycloak servers in it's cluster through the Client Listeners, which is feature of HotRod protocol. Keycloak nodes on site 2 then update their infinispan caches and particular userSession is visible on Keycloak nodes on site 2 too.

Example setup

This is the example setup simulating 2 datacenters site 1 and site 2 . Each datacenter (site) consists of 1 infinispan server and 2 Keycloak servers. So 2 infinispan servers and 4 Keycloak servers are totally in the testing setup.

  • Site1 consists of infinispan server jdg1 and 2 Keycloak servers node11 and node12 .
  • Site2 consists of infinispan server jdg2 and 2 Keycloak servers node21 and node22 .
  • Infinispan servers jdg1 and jdg2 forms cluster with each other and they are used as a channel for communication between 2 datacenters. Again, in production, there is also clustered DB used for replication between datacenters (each site has it's own DB), but that's not the case in the example, which would just use single DB.
  • Keycloak servers node11 and node12 forms cluster with each other, but they don't communicate with any server in site2 . They communicate with infinispan server jdg1 through the HotRod protocol (Remote cache).
  • Same applies for node21 and node22 . They have cluster with each other and communicate just with jdg2 server through the HotRod protocol.
Example setup assumes all 6 servers are bootstrapped on localhost, but each on different ports. It also assumes that all 4 Keycloak servers talk to same database, which can be either locally set MySQL, PostgreSQL, MariaDB or any other. In production, there will be rather separate synchronously replicated databases between datacenters.

Infinispan Server setup

1) Download Infinispan 8.2.6 server and unzip to some folder

2) Add this into JDG1_HOME/standalone/configuration/clustered.xml into cache-container named clustered :

<cache-container name="clustered" default-cache="default" statistics="true">
...
<replicated-cache-configuration name="sessions-cfg" mode="ASYNC" start="EAGER" batching="false">
<transaction mode="NON_XA" locking="PESSIMISTIC"/>
</replicated-cache-configuration>

<replicated-cache name="work" configuration="sessions-cfg" />
<replicated-cache name="sessions" configuration="sessions-cfg" />
<replicated-cache name="offlineSessions" configuration="sessions-cfg" />
<replicated-cache name="actionTokens" configuration="sessions-cfg" />
<replicated-cache name="loginFailures" configuration="sessions-cfg" />

</cache-container>
3) Copy the server into the second location referred later as JDG2_HOME

4) Start server jdg1:

cd JDG1_HOME/bin
./standalone.sh -c clustered.xml -Djava.net.preferIPv4Stack=true \
-Djboss.socket.binding.port-offset=1010 -Djboss.default.multicast.address=234.56.78.99 \
-Djboss.node.name=jdg1
5) Start server jdg2:

cd JDG2_HOME/bin
./standalone.sh -c clustered.xml -Djava.net.preferIPv4Stack=true \
-Djboss.socket.binding.port-offset=2010 -Djboss.default.multicast.address=234.56.78.99 \
-Djboss.node.name=jdg2
6) There should be message in the log that nodes are in cluster with each other:

Received new cluster view for channel clustered: [jdg1|1] (2) [jdg1, jdg2]

Keycloak servers setup

1) Download Keycloak 3.3.0.CR1 and unzip to some location referred later as NODE11

2) Configure shared database for KeycloakDS datasource. Recommended to use MySQL, MariaDB or PostgreSQL. See Keycloak docs for more details

3) Edit NODE11/standalone/configuration/standalone-ha.xml :

3.1) Add attribute site to the JGroups UDP protocol:


<stack name="udp">
<transport site="${jboss.site.name}" socket-binding="jgroups-udp" type="UDP">
3.2) Add output-socket-binding for remote-cache into socket-binding-group element:


<socket-binding-group ... >
...
<outbound-socket-binding name="remote-cache">
<remote-destination host="localhost" port="${remote.cache.port}">
</remote-destination>
</outbound-socket-binding>

</socket-binding-group>
3.3) Add this module attribute into cache-container element of name keycloak :

<cache-container jndi-name="infinispan/Keycloak" module="org.keycloak.keycloak-model-infinispan" name="keycloak">
3.4) Add the remote-store into work cache:


<replicated-cache mode="SYNC" name="work">
<remote-store cache="work" fetch-state="false" passivation="false" preload="false"
purge="false" remote-servers="remote-cache" shared="true">
<property name="rawValues">true</property>
<property name="marshaller">org.keycloak.cluster.infinispan.KeycloakHotRodMarshallerFactory</property>
</remote-store>
</replicated-cache>
3.5) Add the store like this into sessions cache:


<distributed-cache mode="SYNC" name="sessions" owners="1">
<store class="org.keycloak.models.sessions.infinispan.remotestore.KeycloakRemoteStoreConfigurationBuilder"
fetch-state="false" passivation="false" preload="false" purge="false" shared="true">
<property name="remoteCacheName">sessions</property>
<property name="useConfigTemplateFromCache">work</property>
</store>
</distributed-cache>
3.6) Same for offlineSessions and loginFailures caches:


<distributed-cache mode="SYNC" name="offlineSessions" owners="1">
<store class="org.keycloak.models.sessions.infinispan.remotestore.KeycloakRemoteStoreConfigurationBuilder"
fetch-state="false" passivation="false" preload="false" purge="false" shared="true">
<property name="remoteCacheName">offlineSessions</property>
<property name="useConfigTemplateFromCache">work</property>
</store>
</distributed-cache>


<distributed-cache mode="SYNC" name="loginFailures" owners="1">
<store class="org.keycloak.models.sessions.infinispan.remotestore.KeycloakRemoteStoreConfigurationBuilder"
fetch-state="false" passivation="false" preload="false" purge="false" shared="true">
<property name="remoteCacheName">loginFailures</property>
<property name="useConfigTemplateFromCache">work</property>
</store>
</distributed-cache>

3.7) The configuration of distributed cache authenticationSessions and other caches is left unchanged.

3.8) Optionally enable DEBUG logging into logging subsystem:


<logger category="org.keycloak.cluster.infinispan">
<level name="DEBUG">
</level></logger>
<logger category="org.keycloak.connections.infinispan">
<level name="DEBUG">
</level></logger>
<logger category="org.keycloak.models.cache.infinispan">
<level name="DEBUG">
</level></logger>
<logger category="org.keycloak.models.sessions.infinispan">
<level name="DEBUG">
</level></logger>

4) Copy the NODE11 to 3 other directories referred later as NODE12, NODE21 and NODE22.

5) Start NODE11 :


cd NODE11/bin
./standalone.sh -c standalone-ha.xml -Djboss.node.name=node11 -Djboss.site.name=site1 \
-Djboss.default.multicast.address=234.56.78.100 -Dremote.cache.port=12232 -Djava.net.preferIPv4Stack=true \
-Djboss.socket.binding.port-offset=3000

6) Start NODE12 :


cd NODE12/bin
./standalone.sh -c standalone-ha.xml -Djboss.node.name=node12 -Djboss.site.name=site1 \
-Djboss.default.multicast.address=234.56.78.100 -Dremote.cache.port=12232 -Djava.net.preferIPv4Stack=true \
-Djboss.socket.binding.port-offset=4000

The cluster nodes should be connected. This should be in the log of both NODE11 and NODE12:


Received new cluster view for channel hibernate: [node11|1] (2) [node11, node12]
7) Start NODE21 :


cd NODE21/bin
./standalone.sh -c standalone-ha.xml -Djboss.node.name=node21 -Djboss.site.name=site2 \
-Djboss.default.multicast.address=234.56.78.101 -Dremote.cache.port=13232 -Djava.net.preferIPv4Stack=true \
-Djboss.socket.binding.port-offset=5000

It shouldn't be connected to the cluster with NODE11 and NODE12, but to separate one:


Received new cluster view for channel hibernate: [node21|0] (1) [node21]
8) Start NODE22 :


cd NODE22/bin
./standalone.sh -c standalone-ha.xml -Djboss.node.name=node22 -Djboss.site.name=site2 \
-Djboss.default.multicast.address=234.56.78.101 -Dremote.cache.port=13232 -Djava.net.preferIPv4Stack=true \
-Djboss.socket.binding.port-offset=6000

It should be in cluster with NODE21 :


Received new cluster view for channel server: [node21|1] (2) [node21, node22]

9) Test:

9.1) Go to http://localhost:11080/auth/ and create initial admin user

9.2) Go to http://localhost:11080/auth/admin and login as admin to admin console

9.3) Open 2nd browser and go to any of nodes http://localhost:12080/auth/admin or http://localhost:13080/auth/admin or http://localhost:14080/auth/admin . After login, you should be able to see the same sessions in tab Sessions of particular user, client or realm on all 4 servers

9.4) After doing any change (eg. update some user), the update should be immediatelly visible on any of 4 nodes as caches should be properly invalidated everywhere.

9.5) Check server.logs if needed. After login or logout, the message like this should be on all the nodes NODEXY/standalone/log/server.log :


2017-08-25 17:35:17,737 DEBUG [org.keycloak.models.sessions.infinispan.remotestore.RemoteCacheSessionListener]
(Client-Listener-sessions-30012a77422542f5) Received event from remote store.
Event 'CLIENT_CACHE_ENTRY_REMOVED', key '193489e7-e2bc-4069-afe8-f1dfa73084ea', skip 'false'

Conclusion

This is just a starting point and the instructions are subject to change. We plan various improvements especially around performance. If you have any feedback regarding cross-dc scenario, please let us know on keycloak-user mailing list referred from Keycloak home page .

Keycloak 3.3.0.CR2 Released

$
0
0

We've just released Keycloak 3.3.0.CR2.

There's not much here except a few bug fixes. We're still waiting for WildFly 11 Final to be release before we release Keycloak 3.3.0.Final.

To download the release go to the Keycloak homepage.

The full list of resolved issues is available in JIRA.

Upgrading

Before you upgrade remember to backup your database and check the migration guide. Release candidates are not recommended in production and we do not support upgrading from release candidates.

X.509 and Smartcard Authentication with Keycloak

$
0
0

If you want to do X.509 and Smartcard authentication with Keycloak check out this blog post from Stephen Higgs. It walks you through how to setup X.509 authentication with Keycloak and a Yubikey Neo device.


Keycloak 3.3.0.Final released

$
0
0

We've just released Keycloak 3.3.0.Final.

The release contains upgrade of Keycloak server to Wildfly 11.0.0.Final. There are also few bugfixes there.

To download the release go to the Keycloak homepage.

The full list of resolved issues is available in JIRA.

Upgrading

Before you upgrade remember to backup your database and check the migration guide.

Keycloak 3.4.0.CR1 released

$
0
0

We've just released Keycloak 3.4.0.CR1.

To download the release go to the Keycloak homepage.

Highlights

Token exchange

The token exchange service allows clients to exchange tokens for different tokens. There's quite a few options available so check out the docs for more details.

Fine-grained permissions for admin endpoints

By leveraging our authorization services we've made it possible to control permissions in the admin endpoints almost exactly how you want. For more details check the docs.

Cross DC

A lot more work has gone into this release around cross DC support. Docs are still not ready and there's still some minor polish left. This will come soon.

Upgraded to WildFly 11 Final

We've upgraded the underlying container to WildFly 11 Final.

Support MySQL and PostgreSQL in main Keycloak Docker image

We used to have separate Docker images for MySQL and PostgreSQL, but now we have one that supports them all.

AsciiDoctor

Our docs used to be built and hosted on GitBook. We've recently moved to using pure AsciiDoctor to build the docs. The main reason behind this move was to closer align with how we build documentation for the productized version of Keycloak (RH-SSO).

Loads more..

  • Script based protocol mapper for OIDC - thanks to thomasdarimont
  • Blacklisted password policy- thanks to thomasdarimont
  • Login with PayPal - thanks to petlys
  • Almost 200 - we almost resolved 200 issues for this one (197!)

The full list of resolved issues is available in JIRA.

Upgrading

Before you upgrade remember to backup your database and check the upgrade guide for anything that may have changed. Release candidates are not recommended in production and we do not support upgrading from release candidates.

Keycloak 3.4.0.Final released

$
0
0

We've just released Keycloak 3.4.0.Final.

To download the release go to the Keycloak homepage.

The full list of resolved issues is available in JIRA.

Upgrading

Before you upgrade remember to backup your database and check the upgrade guide for anything that may have changed.

Keycloak 3.4.1.CR1 released

$
0
0

We've just released Keycloak 3.4.1.CR1.

To download the release go to the Keycloak homepage.

Highlights

Cross DC

A lot of work has gone into finishing the Cross DC support and it should now be ready to use.

Database Replication

We're now testing database replication with MySQL Galera and Oracle RAC. This is related to Cross DC support which requires a master node in each DC.

Loads more..

  • Loads and loads of fixes

The full list of resolved issues is available in JIRA.

Upgrading

Before you upgrade remember to backup your database and check the upgrade guide for anything that may have changed. Release candidates are not recommended in production and we do not support upgrading from release candidates.

Keycloak 3.4.1.Final Release

$
0
0

We've just released Keycloak 3.4.1.Final.

To download the release go to the Keycloak homepage.

The full list of resolved issues is available in JIRA.

Upgrading

Before you upgrade remember to backup your database and check the upgrade guide for anything that may have changed.

Keycloak 3.4.2.Final Released

$
0
0

We've just released Keycloak 3.4.2.Final.

To download the release go to the Keycloak homepage.

The full list of resolved issues is available in JIRA.

Upgrading

Before you upgrade remember to backup your database and check the upgrade guide for anything that may have changed.

Keycloak 3.4.3.Final released

$
0
0

We've just released Keycloak 3.4.3.Final.

To download the release go to the Keycloak homepage.

The full list of resolved issues is available in JIRA.

Upgrading

Before you upgrade remember to backup your database and check the upgrade guide for anything that may have changed.


Keycloak, Apache and OpenID Connect

Keycloak Cross Data Center Setup in AWS

$
0
0

Sample Keycloak Cross Data Center Setup in AWS Environment

With Keycloak 3.3.0, the support for large-scale deployment across multiple data centers (also called cross site, X-site, cross data-center, cross-DC) has become available. The natural question arose about how this support can be utilized in cloud environment. This blog post follows up on previous blog post on setting up cross-DC locally, and enhances it with an example of how to setup this type of deployment in Amazon Web Services (AWS).
It is strongly recommended to use version 3.4.3.Final at minimum as there were several important fixes done around cross-DC support since the first cross-DC-capable version.

Architecture

The general architecture of a cross-DC deployment is described in detail in Keycloak documentation and briefly shown in the following diagram. There are several data centers (site1 and site2 in the picture that can be found in full scale in the documentation). The sites have a replicated database, set up ideally in multimaster synchronous replication mode. Each site has a cluster of Keycloak nodes and a cluster of Infinispan nodes. The clusters of Keycloak nodes are hidden behind a load balancer in private subnet; Infinispan nodes form a cluster within corresponding data center, and in addition utilize RELAY protocol to backup each other across data centers.

Example

This post is based on three CloudFormation templates that gradually build two data centers with Keycloak instances, each data center in a separate AWS availability zone sharing the same virtual private cloud (VPC). Note that the templates are intended for trying/testing purposes only, not for production. The templates are described below:
  1. VPC stack. This stack creates a new VPC with four subnets: two of them in one availability zone, another two in another availability zone. One of the subnet in each availability zone is private, intended for Keycloak instances; the other subnet in each availability zone is intended for load balancer and Infinispan (so that these can communicate over the internet).

    The only parameter in this stack is the number B in VPC IP address range 10.B.0.0/16.

    Click the button below to launch this stack:
  2. Database and AMI stack. This stack creates an RDS Aurora MySQL-compatible database instance, builds Keycloak from source, creates S3 buckets necessary for dynamic node discovery via S3_PING protocol, and produces AMI image that contains both Keycloak and Infinispan preconfigured to form appropriate clusters. It relies on AWS Lambda-backed custom resources, so in order to create them, it is required that this template creates a role for these Lambdas. To launch this template, it is hence required that the user grants the CAPABILITY_IAM capability.

    Both Keycloak and Infinispan server are prepared just the same way as for running cross-DC tests, and then are placed into /opt/tests path and the relevant part of their configuration is updated to suit AWS deployment.

    This template has several parameters, most of them are self-describing:
    VPC stack name: Name of the stack created in the previous step
    Instance type for building image
    Database instance type: Type of the database as available in RDS
    Install diagnostic tools: Flag signalling whether the diagnostic tools should be installed
    URL to Maven repository for build: To speed up build, instead of downloading each Maven artifact, URL with a .zip file containing the whole $HOME/.m2 directory can be provided that would be unpacked prior to the actual build and provide the artifacts, thus speeding the build up.
    Keycloak Git repository and Git tag/branch/commit: Git repository and tag from which the build should start.

    Click the button below to launch this stack:
  3. Keycloak deployment stack. This stack creates instantiates one Infinispan node in public subnet per data center, given number of Keycloak servers in private subnet joined in the cluster in each data center, and an AWS Application load balancer to spread the load between the actual Keycloak servers. If not restoring database from backup, it also creates an initial user admin with password admin in master realm, and also configures master realm to permit insecure http access to the admin console (remember, it is only a test instance, don't do this in production!).

    This template has several parameters, most of them are self-describing:
    - AMI stack name: Name of the stack created in the previous step
    Keycloak instances per data centre: Number of Keycloak nodes per data center
    Instance type for Keycloak servers
    Instance type for Infinispan servers
    SSH key name: Name of EC2 ssh key used for instance initialization
    Load balancer scheme: This settings determines whether the load balancer would be assigned a public or private IP only. See AWS documentation for further information.
    Database backup URL: In case you have a dump of Keycloak MySQL/MariaDB database, you can initialize the database with it by providing URL to that dump. The dump might be optionally gzipped, .gz suffix of that dump is then mandatory.

    Click the button below to launch this stack:
Once you launch the last stack, Keycloak will be available at the load balancer address that will be shown in Outputs tab of the third stack under LoadBalancerUrl key.

Connecting to nodes

Since Infinispan nodes are assigned public IPs and the security group is set to permit SSH traffic, you can use standard way to access Infinispan nodes.

Accessing Keycloak nodes is only a bit more complicated since these are spawned in private subnets and can only be accessed via Infinispan nodes. You can either copy the private key to the intermediate Infinispan node and use it from there, or (easier) use SSH agent forwarding as follows:
  1. On your local host, add your AWS ssh key to agent:
    ssh-add /path/to/my/aws_ssh_key
  2. Now ssh to the Infinispan host with ssh adding the ForwardAgent option:
    ssh -oForwardAgent=yes \
      ec2-user@${InfinispanServerDcX.PublicDnsName}
  3. From the Infinispan host, you can now ssh to the Keycloak node:
    ssh ec2-user@${KeycloakServerDcX.PrivateDnsName}

Connecting to Infinispan JConsole

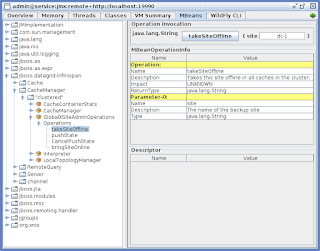
As you would find out from the cross-DC guide, many of the DC-wide operations require running JConsole and invoking operations on Infinispan JMX MBeans. For example, to take a DC offline, one has to first disable backups from the other DCs into the DC about to be shut down, and that is performed by invoking takeSiteOffline operation on CacheManager's GlobalXSiteAdminOperations MBean.

To connect, it is easiest to have a tunnel created to the Infinispan node via SSH command. To simplify the situation a bit, the ssh command for connecting to Infinispan server and creating the tunnel is shown in the Outputs tab of the third stack under SshToInfinispanDcX key, and it takes the following form:

ssh -L 19990:127.0.0.1:9990 \
 -oStrictHostKeyChecking=no \
 -oUserKnownHostsFile=/dev/null \
 -oForwardAgent=yes \
  ec2-user@${InfinispanServerDcX.PublicDnsName}

In the command above, the host key checking is effectively disabled as this is only a test run, do not do this in production!
Now it is necessary to add an Infinispan management user so that it is possible to fill in JConsole credentials:

/opt/tests/cache-server-infinispan/bin/add-user.sh -u admin -p pwd

The last thing is to run actual JConsole. Since JConsole does not have support for the service:jmx:remote+http protocol used by both Infinispan and Keycloak, it is necessary to modify JConsole classpath. Fortunately, this work has been already done in WildFly so we can use a script already prepared there. On your local host, extract either WildFly 10+ or Infinispan to path WF_ROOT, and run the following command:

WF_ROOT/bin/jconsole.sh

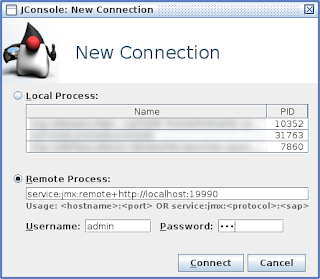
In the New Connection window, specify Remote Process properties as follows (note that we're using port 19990 on localhost forwarded securely by ssh to actual management port above, this requires the ssh command above to be running for the whole time JConsole is used):
  • Remote Process: service:jmx:remote+http://localhost:19990
  • Username: admin
  • Password: pwd


Now you can connect to the running instance, navigate to any bean you need and perform operations as needed. The backup site names are configured by the AMI stack to values dc-1 and dc-2.


For further details, please inspect the configuration files in /opt/tests/auth-server-wildfly/standalone/configuration/standalone-ha-DC.xml and /opt/tests/cache-server-infinispan/standalone/configuration/clustered-DC.xml.

Disclaimer

This blog has been written at the time Keycloak 3.4.3.Final has been released. There may be incompatible changes in the future but you should still be able to run the templates with this version.

Troubleshooting AWS specifics

  • Node discovery in both Keycloak and Infinispan cluster in AWS is handled by S3_PING protocol. This protocol however can operate only in regions that support Version 2 signatures due to this JGroups bug. See Amazon documentation on S3 endpoints for regions that support Version 2 signatures. Note that it might be possible to use new NATIVE_S3_PING protocol but this one has not yet been incorporated into Keycloak due to this WildFly issue. As a workaround, you might be able to use other discovery protocol, e.g. JDBC_PING.
  • The recommended database products for cross-DC deployments are only those listed in the documentation (currently Oracle Database 12c RAC and Galera cluster for MariaDB). It is possible to use ones available from Amazon RDS service. The templates from this blog are only ready for MySQL/MariaDB databases.
  • It is possible to use Amazon ALB for load balancing when the related target group is set to support Load balancer stickiness. ALB uses proprietary load balancer cookie and ignores routes set in Keycloak cookies, hence adding the route to cookie should be disabled in Keycloak configuration.

Keycloak and Angular CLI

$
0
0
So I made a schematic that installs and configures Keycloak in any Angular CLI application.

If you want to try it out, do this from the command line:
> npm install -g @ssilvert/keycloak-schematic
> ng new myApp
> cd myApp
> ng generate keycloak --collection @ssilvert/keycloak-schematic --clientId=myApp

Now Keycloak is integrated into your app.  Of course, you can do this with any existing Angular CLI application.  It doesn't have to be a new one.

Then, go to the Keycloak Admin console (master realm) and go to Clients --> Add Client --> Select File.

Select the client-import.json file that the "ng generate keycloak" command created in /myApp.

Assuming your Keycloak server is running on localhost:8080, you are ready to go.  Start your application:
> ng serve

Go to your browser to start the app and see this:
Oh joy! myApp is protected with Keycloak!

The keycloak-schematic installs a KeycloakService and a KeycloakGuard.  So you can easily:
  • Add login/logout buttons
  • Access user self service (account management)
  • Guard protected routes instead of the whole app
  • Work with roles
  • Lots more
Click here for a comprehensive getting started guide, full documentation, and sample code.

Note that this stuff is early alpha right now.  And it will move from @ssilvert to @keycloak before long.  In the mean time, I'd love to get feedback.  There is a lot to do to make Keycloak/Angular integration even better, but I think the keycloak-schematic is a big step forward.

So long, and thanks for all the fish.

Stan


Keycloak and Istio

$
0
0

Keycloak and Istio

This short blog post is to share the first trials of combining Keycloak with Istio. 

What is Istio ?  

Istio is an platform that provides a common way to manage your service mesh. You may wonder what a service mesh is, well, it's an infrastructure layer dedicated to connect, secure and make reliable your different services. 

Istio, in the end, will be replacing all of our circuit-breakers, intelligent load balancing or metrics librairies, but also the way how two services will communicate in a secure way. And this is of course the interesting part for Keycloak. 

As you know Keycloak uses adapters for each of the application or service that it secures. These adapters make sure to perform the redirect if needed, to retrieve the public keys, to verify the JWT signature etc ...
There are a lot of different adapters depending on the type of application or technology that is used : there are Java EE adapters, JavaScript adapters and we even have a NodeJS adapter. 

The end of the adapters ? 

Following the Istio philosophy, these adapters would not be needed in the end because the Istio infrastructure will take care of the tasks the adapters were doing (signature verification etc ...). We are not yet there for now but in this post we will see what can already be done with Istio and how much it already can replace the role of the Adapters. 

The Envoy Sidecar

We won't dive into the details on how Istio works but there is one main concept to understand around which Istio is articulated : the Envoy Sidecar. Envoy is a high performance proxy deployed alongside with each deployed service and this is the reason we call it a "sidecar".  

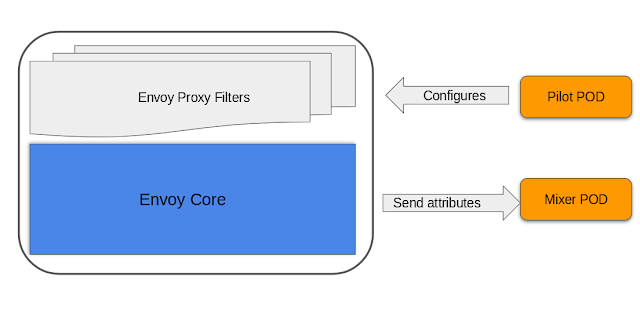
Envoy captures all incoming and outgoing traffic of its "companion" service, it can then apply some basic operations and also collect data and send it to a central point of decision, called the "mixer" in Istio. The conifugration of Envoy itself happens through the "pilot" an other Istio component. 


Envoy Filters

To make it easier to add new functionnality to the Envoy Proxy, there is the concept of filters that you can stack up. Again, these filters can be congifured by the Pilot and they can gather information for the Mixer : 

The JWT-Auth Filter

The Istio team has been developping a filter that interest us : the jwt-auth filter. As the name suggests, this filter is capable of performing checks on a JWT token that the Envoy Proxy will extract from the HTTP Request's headers. 

The details about this filters can be found here.

The Keycloak-Istio Demo 

Now that you have the big picture in mind let's take a look at the demo that has been developed by Kamesh Sampath  (@kamesh_sampath) From the Red Hat Developer Experience Team to show how Keycloak and Istio can be combined : 


The demo will be running inside a Minishift instance, Minishift is a tool that helps to run OpenShift locally. Minishift has really nice support for Istio, as it takes only a few commands to install the Istio layer inside a Minishift instance. 

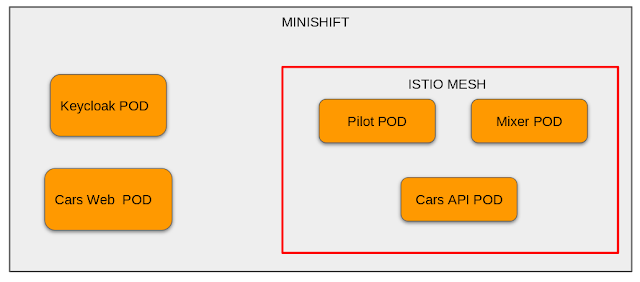
So inside our Minishift instance we will have  : 
  • A Keycloak Pod : a pod containing a Keycloak Server. 
  • A Web App Pod (Cars Web): this pod contains the Web App that will perform the authentification through the Keycloak login in order to obtain a JWT token 
  • Then we have the Istio related components :
    • The Pilot to configure the Envoy proxies
    • The Mixer to handle the attributes returned by Envoy
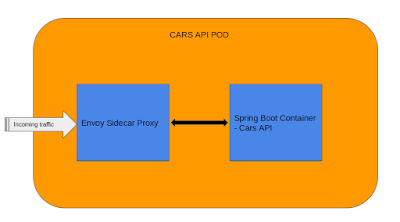
  • The API Service (Cars API) : this pod will have two containers :
    • The API service itself, in this case a simple Spring Boot Application
    • The Envoy Side-Car container

The demo repository provides the Istio script to delpoy the Envoy Sidecar alongside the Spring Boot Api Service. 

Thi is how the Cars API Pod looks like after it is deployed : 


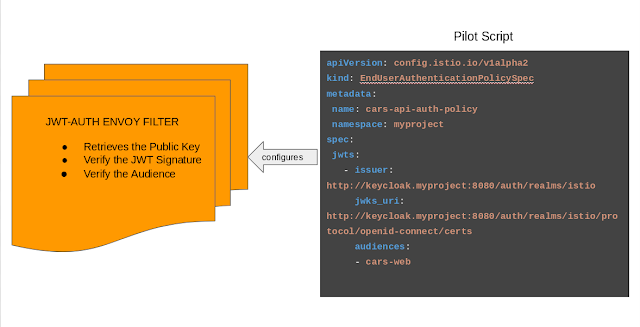
Now, the Envoy Sidecar needs to be configured : 
  • We indicate what needs to be configured, the kind of policy and implicitly the correct filter (in our case the jwt-auth filter) will be configured. 
  • It needs to know where to retrieve Keycloak's Public key in order to verify the JWT signature. 
  • The issuer : who has generated the token ? In this case it's also the Keycloak Server. 

Now each incoming request to the API Service will be checked by the Envoy Sidecar to see if the JWT token contained in the header is valid or not. If it's valid the request be authorized otherwise
an error message will be returned. 

The full instructions of the demo (including setting up Minishift with Istio) can be found here and again thanks to the awesome Kamesh for the work he delivered for this demo. 

Keycloak 4.0.0.Beta1 Released

$
0
0

I'm very pleased to announce the first release of Keycloak 4!

To download the release go to the Keycloak homepage.

Highlights

Brand new login pages

The login pages have received a brand new look. They now look much more modern and clean!

UMA 2.0

Authorization Services have now introduced support for UMA 2.0 and added support for users to manage user access through the account management console. There's also a number of other additions and improvements to authorization services.

Themes and Theme Resources

It's now possible to hot-deploy themes to Keycloak through a regular provider deployment. We've also added support for theme resources. Theme resources allows adding additional templates and resources without creating a theme. Perfect for custom authenticators that require additional pages added to the authentication flow.

We've also added support to override the theme for specific clients. If that doesn't cover your needs, then there's a new Theme Selector SPI that allows you to implement custom logic to select the theme.

Native promise support to keycloak.js

The JavaScript adapter now supports native promises. Of course it still has support for the old style promises as well. Both can be used interchangeably.

Edit links in documentation

To make it easier to contribute changes to the documentation we have added links to all sections of the documentation. This brings you straight to the GitHub editor for the relevant AsciiDoctor file. There's also a quick link to report an issue on a specific page that will include the relevant page in the description.

HTTPS support on keycloak.org

Thanks to GitHub pages and Let's Encrypt there's finally HTTPS on keycloak.org. About time?

Loads more..

The full list of resolved issues is available in JIRA.

Upgrading

Before you upgrade remember to backup your database and check the upgrade guide for anything that may have changed.

Viewing all 99 articles
Browse latest View live


<script src="https://jsc.adskeeper.com/r/s/rssing.com.1596347.js" async> </script>